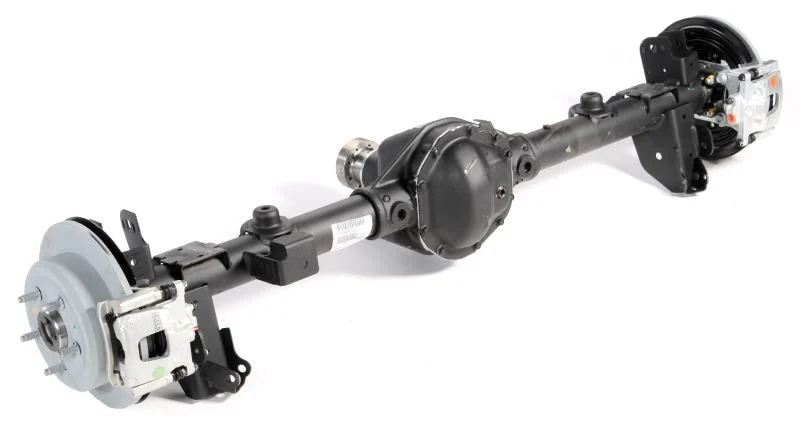
The rear axle assembly is a critical component in your vehicle’s drivetrain, responsible for transferring power from the engine to the rear wheels. Over time, the rear axle can experience wear and tear, requiring a replacement to ensure the smooth functioning of your vehicle. While replacing the rear axle assembly might seem like a complicated task, with the right tools, knowledge, and patience, it can be done as a DIY project.
In this step-by-step guide, we’ll walk you through the process of replacing your rear axle assembly, highlighting key considerations, tools, and safety tips to help you successfully complete the job.
Tools and Equipment You’ll Need
Before you start the replacement process, ensure you have the proper tools and equipment. Here’s a list of what you’ll need:
-
Jack and jack stands: To lift and support your vehicle safely.
-
Socket set: For removing bolts and nuts.
-
Wrench set: For loosening and tightening components.
-
Breaker bar: To help remove stubborn bolts.
-
Torque wrench: To ensure bolts are tightened to the correct specification.
-
Impact wrench: Optional, but useful for loosening tough bolts.
-
Pry bar: To help with separating components that may be stuck.
-
Rear axle assembly: Make sure you have the correct replacement part for your vehicle.
-
Lubricant/grease: To lubricate moving parts and prevent corrosion.
-
Safety gear: Gloves, goggles, and closed-toe shoes for protection.
Step 1: Prepare Your Vehicle
Safety should always come first when performing any DIY car repair. Start by parking your vehicle on a flat, level surface, away from traffic. Then, follow these steps to prepare:
-
Lift the vehicle: Use a car jack to lift the rear of the vehicle. Place the jack stands underneath the vehicle to provide additional support. Always ensure the vehicle is stable before proceeding.
-
Remove the wheels: Using a socket or impact wrench, remove the nuts securing the rear wheels. Set the wheels aside for later reinstallation.
-
Place wheel chocks: To prevent the vehicle from rolling, place wheel chocks under the front wheels.
Step 2: Remove the Old Rear Axle Assembly
Now that your vehicle is safely lifted and the wheels are removed, it’s time to focus on removing the old rear axle assembly. This step will vary slightly depending on the vehicle, but the general procedure is the same.
1. Disconnect the Brake Components
-
If the rear axle is connected to the brake components, you’ll need to disconnect them before proceeding. This includes the brake lines and parking brake cables. Use a wrench to remove the brake line fittings, and carefully move the brake parts aside to avoid damaging them.
2. Disconnect the Driveshaft
-
The driveshaft connects the rear axle assembly to the vehicle’s transmission. Use your socket set to remove the bolts securing the driveshaft to the differential. Once the bolts are removed, slide the driveshaft away from the axle assembly.
3. Remove the U-bolts and Mounting Bolts
-
The rear axle assembly is usually secured with U-bolts or other mounting bolts. Use a socket or breaker bar to remove these bolts. In some vehicles, you may need to also disconnect suspension components, like the shocks or leaf springs, to fully free the axle.
4. Lower the Rear Axle
-
Once all bolts and connections are removed, carefully lower the rear axle assembly. You may need a pry bar to separate any components that are stuck. Take your time to avoid damaging any surrounding parts.
Step 3: Prepare the New Rear Axle Assembly
With the old axle removed, it’s time to prepare the new rear axle assembly for installation. Before placing the new axle under your vehicle, consider the following:
1. Inspect the New Axle Assembly
-
Check the new axle assembly to ensure it matches the specifications of your old one. Make sure the differential, axle shafts, and mounting points are identical to avoid any compatibility issues.
2. Lubricate Components
-
Apply grease or lubricant to the moving parts of the axle, including the axle shafts and bearings. This will help ensure smooth operation and prevent premature wear.
3. Align the New Axle Assembly
-
With assistance or by yourself, lift the new rear axle assembly into position. Align it with the mounting points and ensure it is properly positioned underneath the vehicle.
Step 4: Install the New Rear Axle Assembly
Now comes the installation of the new rear axle assembly. This process is essentially the reverse of removal, but there are a few important steps to follow to ensure everything is secure and properly aligned.
1. Attach the U-bolts and Mounting Bolts
-
Begin by securing the rear axle assembly with the U-bolts and mounting bolts. Tighten these bolts with a wrench, but don’t fully tighten them just yet. This allows for adjustments in alignment.
2. Reconnect the Driveshaft
-
Reattach the driveshaft to the differential by aligning the splines and securing it with the bolts you previously removed. Tighten the bolts to the manufacturer’s specified torque.
3. Reconnect the Brake Components
-
Reattach the brake lines and parking brake cables to the rear axle assembly. Make sure the connections are secure to prevent any leaks. If you removed brake components, reinstall them according to the manufacturer’s instructions.
4. Reinstall Suspension Components
-
If you disconnected suspension parts such as shocks or leaf springs, reconnect them to the rear axle assembly. Tighten all the bolts to the proper torque specifications.
5. Tighten All Bolts
-
Go through each of the bolts you installed and tighten them to the proper torque specification. A torque wrench is essential for this step, as over-tightening or under-tightening can cause serious issues down the line.
Step 5: Reinstall the Wheels and Lower the Vehicle
Once the rear axle assembly is securely in place, it’s time to put everything back together.
-
Reinstall the wheels: Place the wheels back onto the wheel studs and hand-tighten the lug nuts.
-
Lower the vehicle: Carefully raise the vehicle using the jack, remove the jack stands, and then lower the car back onto the ground.
-
Tighten the lug nuts: Using a cross-pattern technique, tighten the lug nuts to the manufacturer’s torque specifications.
Step 6: Test the Vehicle
Before hitting the road, it’s important to test the vehicle to ensure everything is functioning correctly.
-
Check for leaks: Start the car and check for any fluid leaks around the differential or brake lines.
-
Test drive: Take the vehicle for a short test drive to make sure the rear axle is working smoothly. Listen for any abnormal sounds, such as grinding or whining, which may indicate an issue with the installation.
-
Recheck bolt tightness: After driving, recheck all bolts, nuts, and connections to make sure they are still properly tightened.
Conclusion
Replacing a rear axle assembly can seem like an intimidating task, but with the right tools and preparation, it’s a manageable DIY project for those with some automotive experience. By following the steps outlined in this guide, you can successfully replace your vehicle’s rear axle assembly and restore its performance.
Always remember to prioritize safety by using the proper lifting equipment, securing the vehicle, and wearing safety gear. If you’re ever unsure about any aspect of the replacement process, it’s best to consult a professional mechanic. With patience and attention to detail, you can ensure that your rear axle assembly is replaced correctly, saving both time and money in the long run. You can visit Trendinghub24 to get more information.